
How to Set Up IPTV on Kodi (XBMC) Version 17 & Up
Set Up IPTV on Kodi (XBMC) Version 17 & Up
If you’re looking to set up IPTV on Kodi, you’ve landed in the right place. Kodi’s flexibility makes it one of the best platforms for streaming live television, and with the right configuration, you’ll have access to thousands of channels right from your home screen.
What You’ll Need Before Getting Started
Before diving into the installation steps, make sure you’ve got these basics covered. First, you’ll need a working installation of Kodi version 17 (Krypton) or higher on your device. The good news? Kodi is free and available for pretty much every platform imaginable—Windows, Mac, Linux, Android, iOS, and various TV boxes.
Second, and this is crucial, you’ll need an IPTV subscription or a valid M3U playlist URL. Think of the M3U file as your channel lineup—it tells Kodi where to find all your live streams. Most legitimate IPTV service providers will give you this URL through their customer dashboard, and it typically looks something like “http://example.com/playlist.m3u“
Finally, if your IPTV provider offers it, grab the EPG (Electronic Program Guide) URL too. This isn’t mandatory, but it makes your viewing experience so much better—you’ll see what’s currently playing and what’s coming up next, just like traditional cable TV.
. Fast Tutorial to Set Up IPTV on Kodi .
How to Setup PVR IPTV Simple Client Kodi Krypton 17

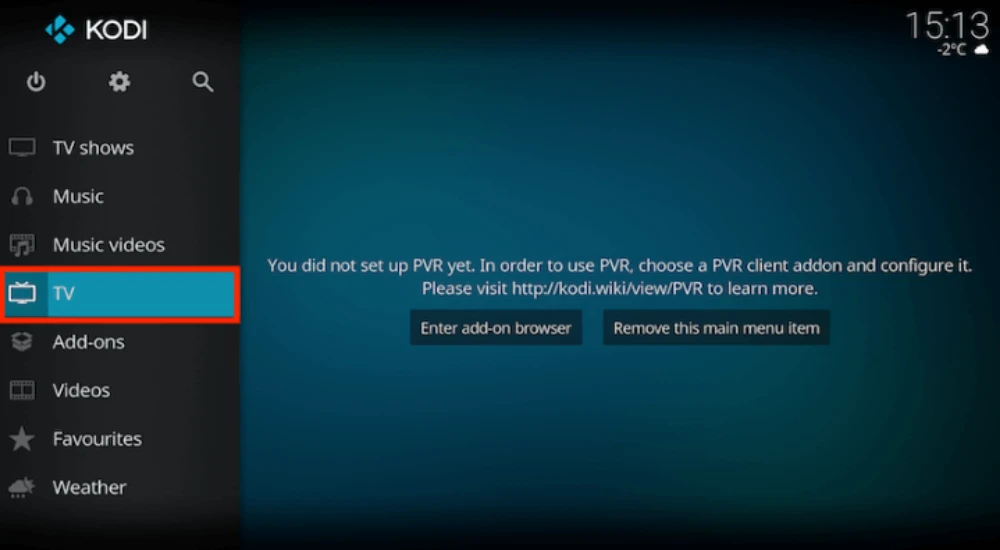
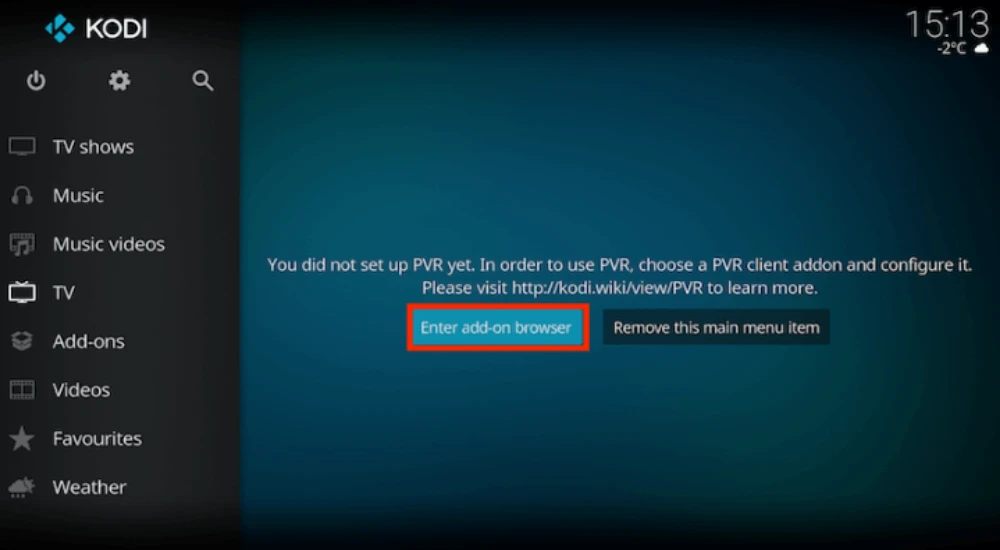
Open KodiSelect TV
Select Enter add-on browser
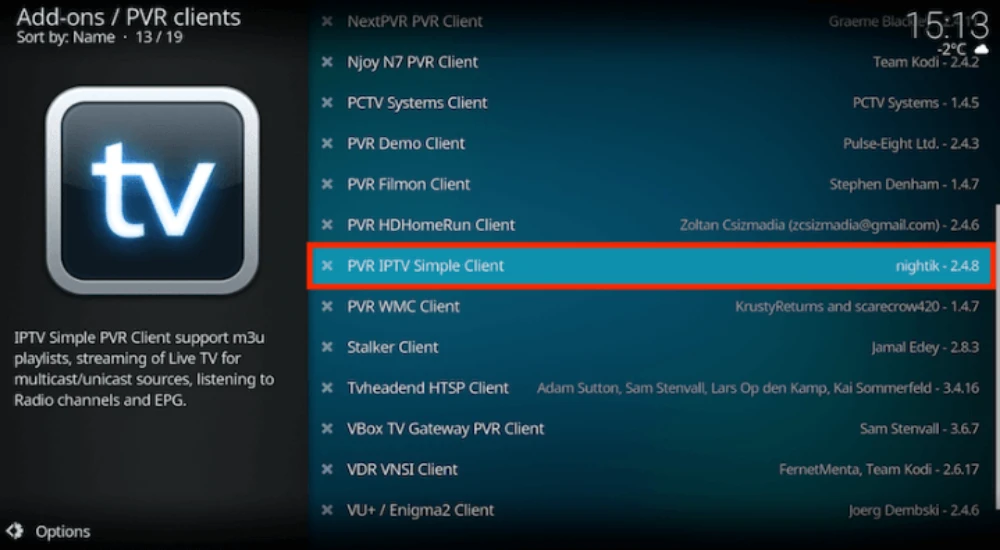
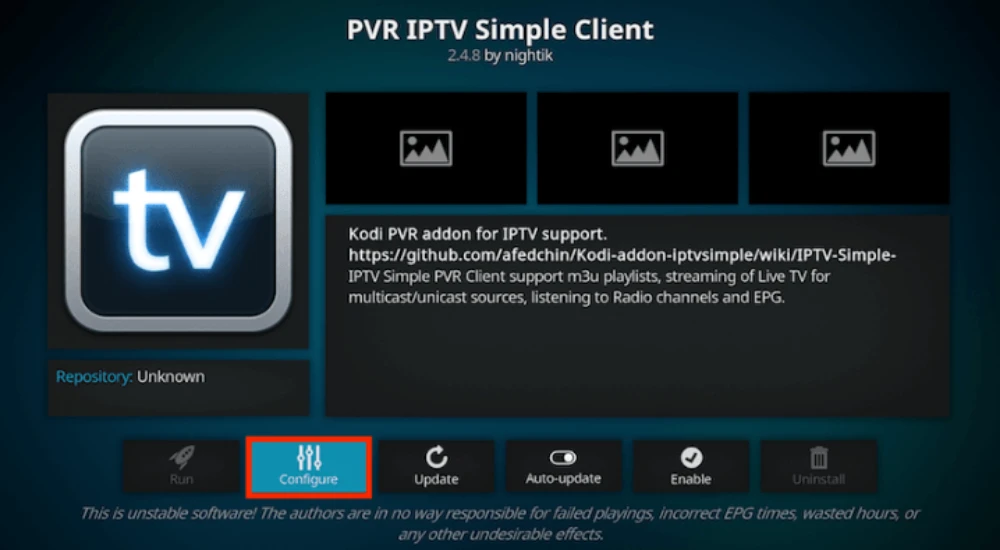
Select PVR IPTV Simple Client
Select Configure
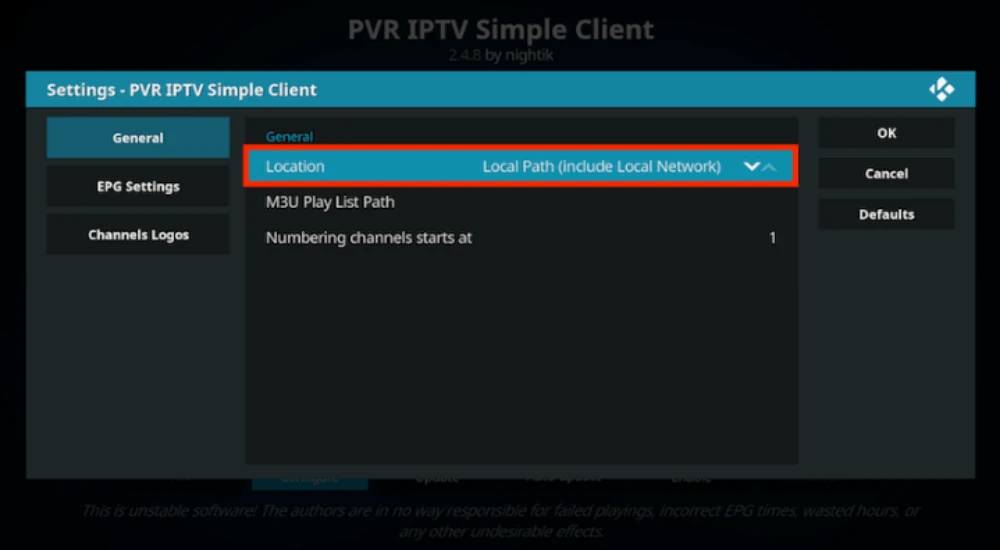
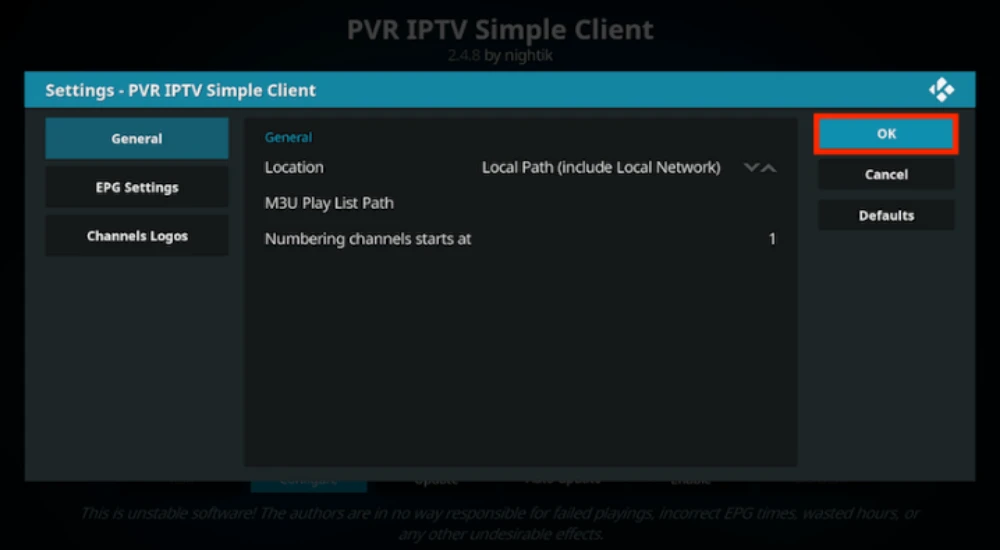
Select General
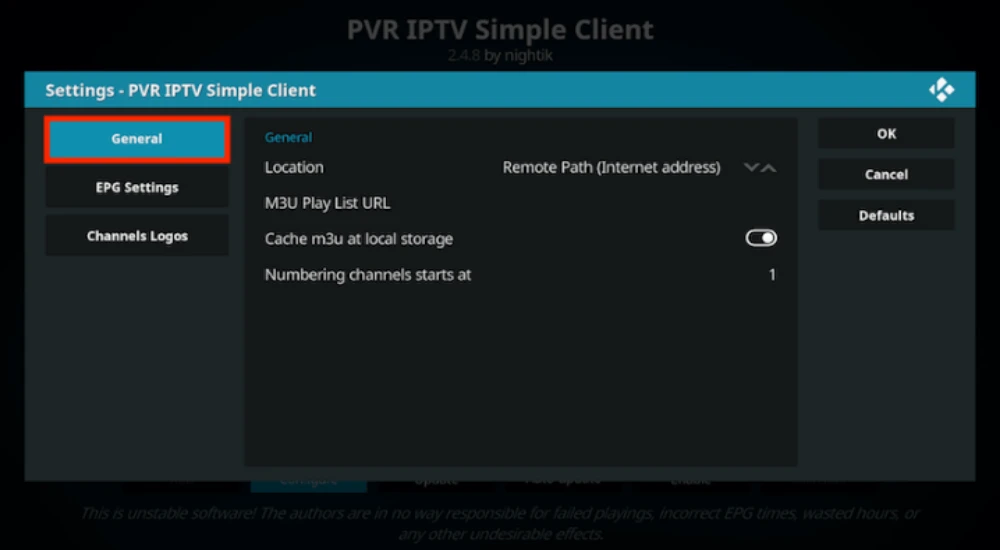
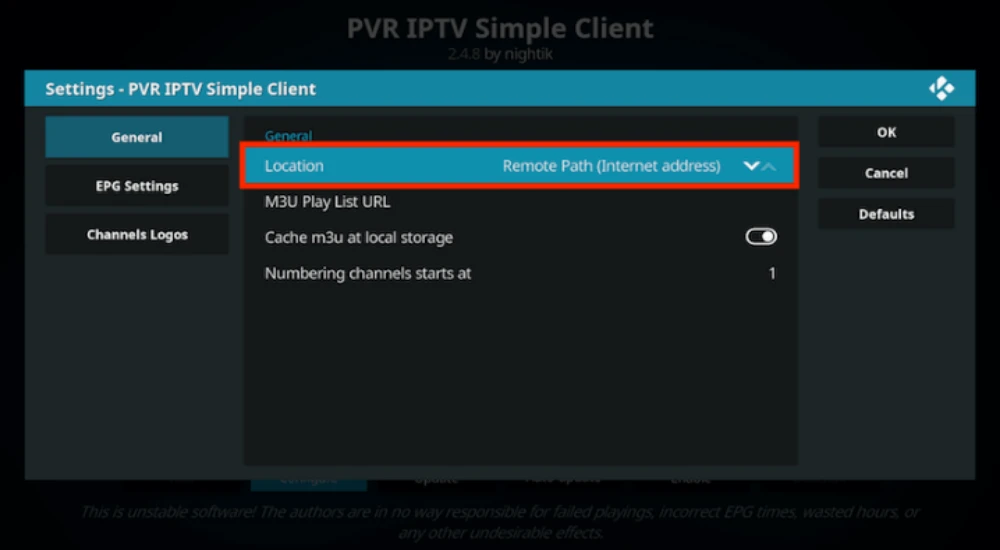
If you have your subscription m3u URL set Location to Remote Path
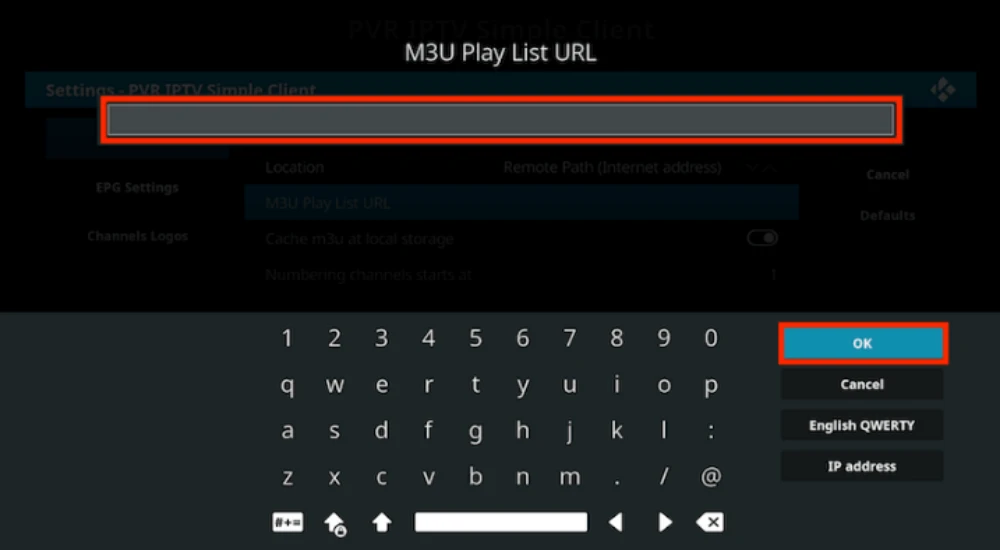
Then Select M3U PlayList URL
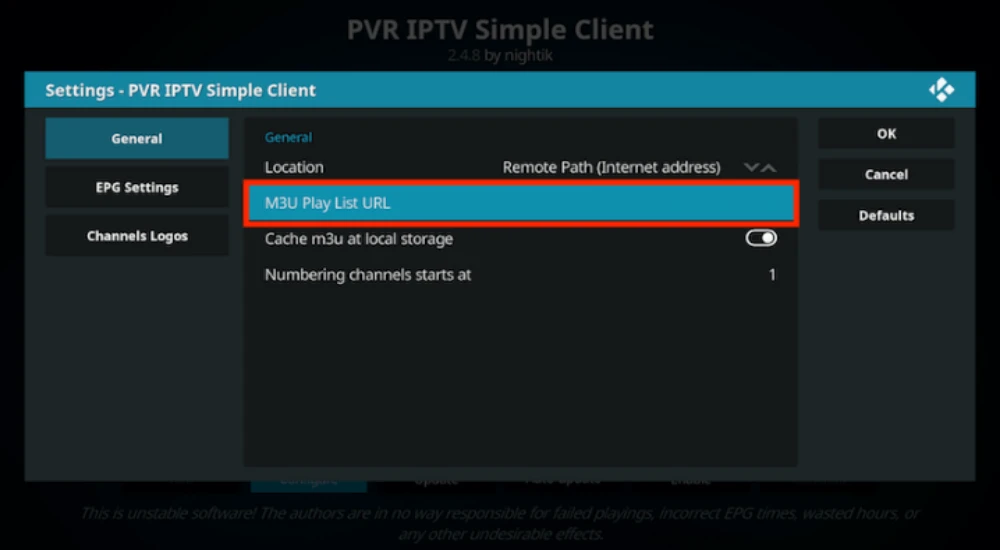
Enter the URL of your M3U PlayList and select OK
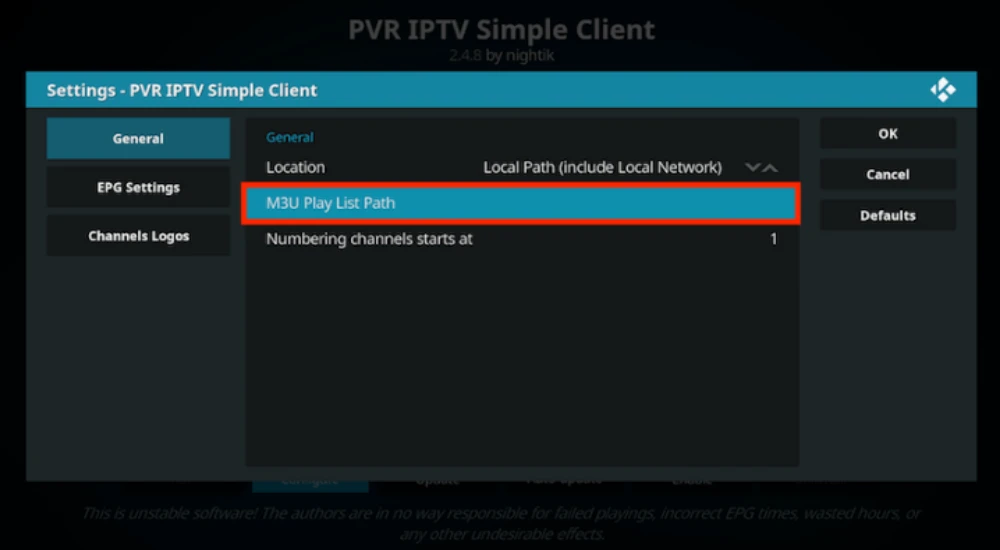
If you have an M3U text file stored locally on your network/computer/box then set the Location to Local Path (include Local Network)
Then Select M3U PlayList URL
Navigate to where the file is stored and select it
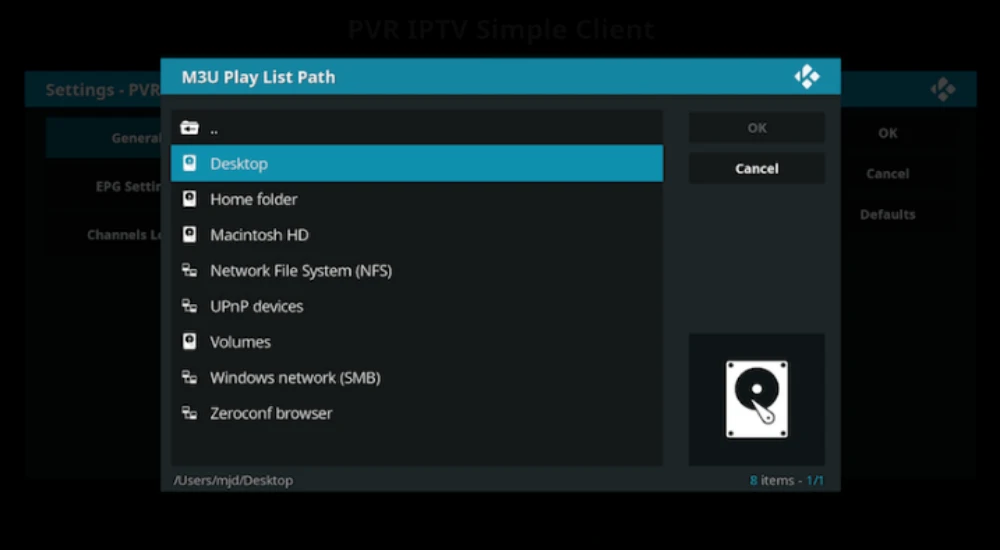
Select OK
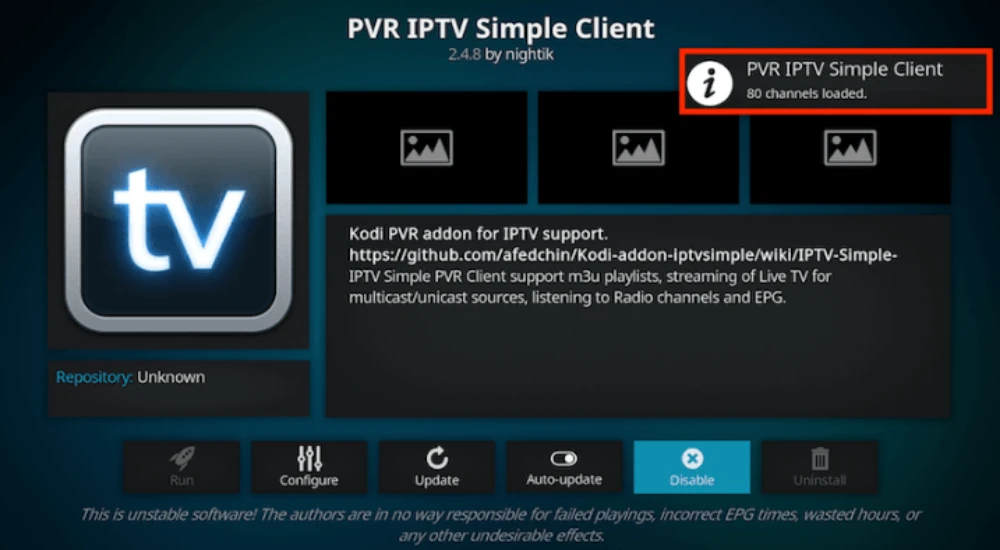
Wait for notification of channels loaded
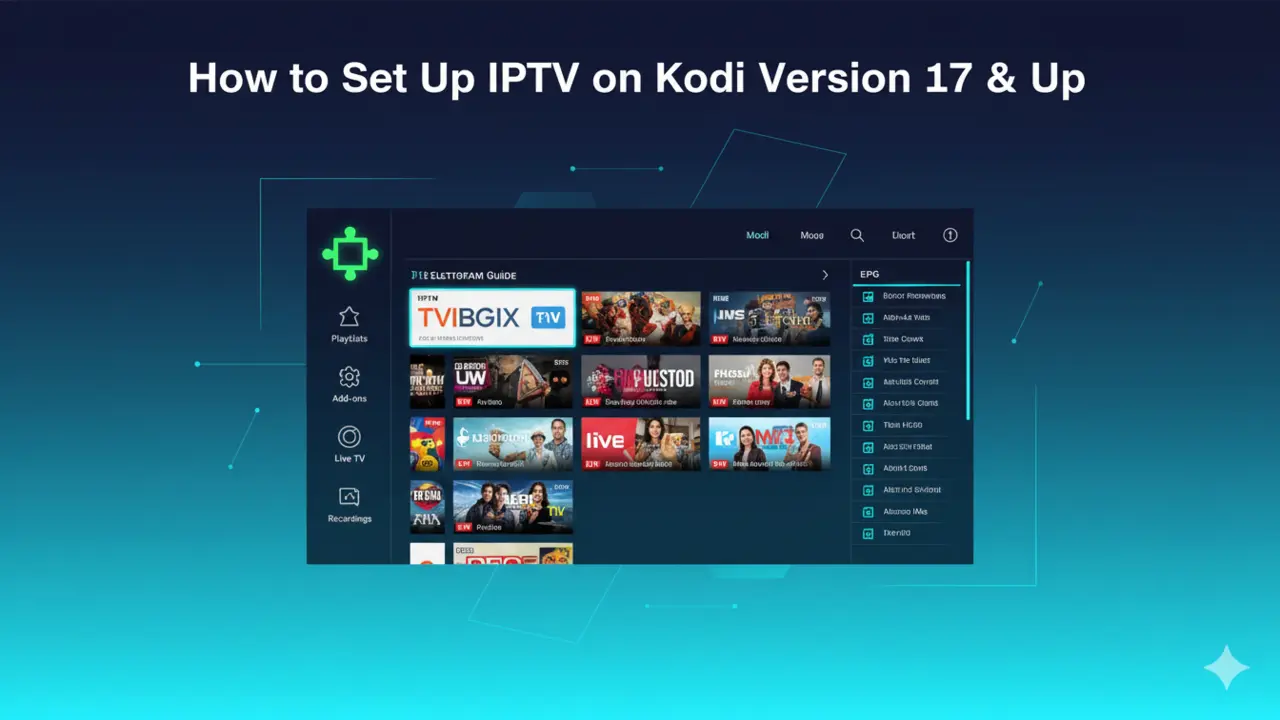
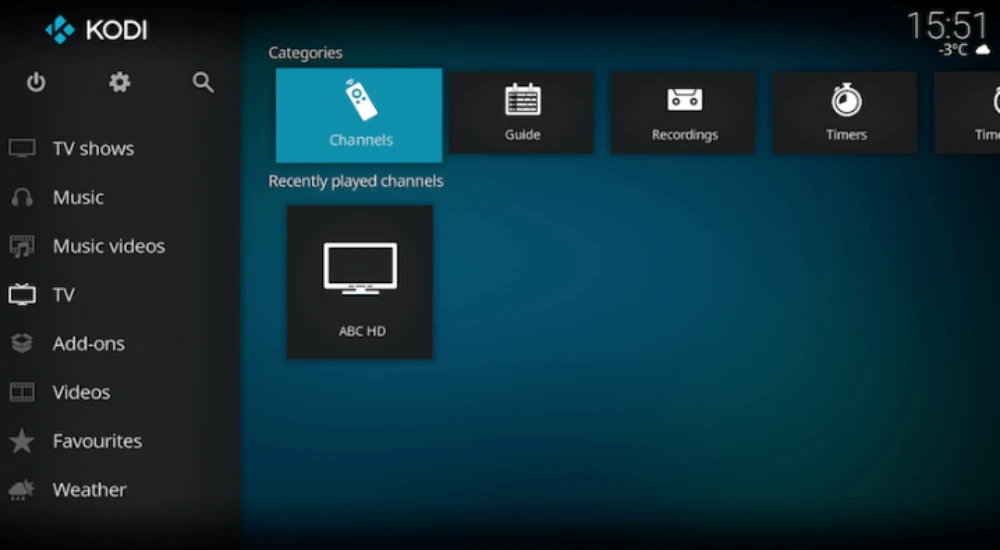
Now when you go back to the Home Screen and select TV it should look like this
Enjoy
. Complete Guide to Set Up IPTV on Kodi .
Installing PVR IPTV Simple Client
The PVR IPTV Simple Client is the backbone of IPTV functionality in Kodi. It’s actually built right into Kodi’s official repository, which means you won’t need to mess around with sketchy third-party sources.
Here’s how to get it installed. Open Kodi and click the Settings gear icon in the top-left corner—you’ll find it just below the Kodi logo. From there, navigate to the Add-ons section. You’ll see several options here, but you want to click “Install from repository”.
Once you’re in the repository menu, select “All repositories” and scroll down until you find “PVR clients”. This category houses all the Personal Video Recorder add-ons that Kodi supports. Look for “PVR IPTV Simple Client” in the list—it should be alphabetically organized, making it easy to spot.
Click on it, then hit the Install button. Kodi will automatically download any supporting add-ons it needs, which usually takes just a few seconds. You’ll get a notification in the top-right corner once everything’s successfully installed.
Configuring Your IPTV Service
Now comes the important part—actually connecting your iptv service to Kodi. After installation, navigate back to the Add-ons menu and select “My add-ons”. From there, go to “PVR Clients” and you’ll see the PVR IPTV Simple Client listed.
Click on it and select “Configure”. This opens up the configuration screen where you’ll input all your IPTV details. Under the General tab, you’ll see a field labeled “Location”. Set this to “Remote path” if you’re using an online M3U playlist (which most people are).
Now here’s where you paste that M3U playlist URL your IPTV provider gave you. Be super careful here—even a tiny typo will prevent your channels from loading. Copy and paste directly from your provider’s dashboard if possible, rather than typing it manually.
If you’ve got an EPG URL, scroll down to the EPG Settings tab. Look for the field labeled “XMLTV URL” and paste your EPG link there. This step is optional, but trust me, having a program guide makes channel surfing infinitely more enjoyable. Once everything’s entered, click OK to save your settings.
Enabling Live TV in Kodi
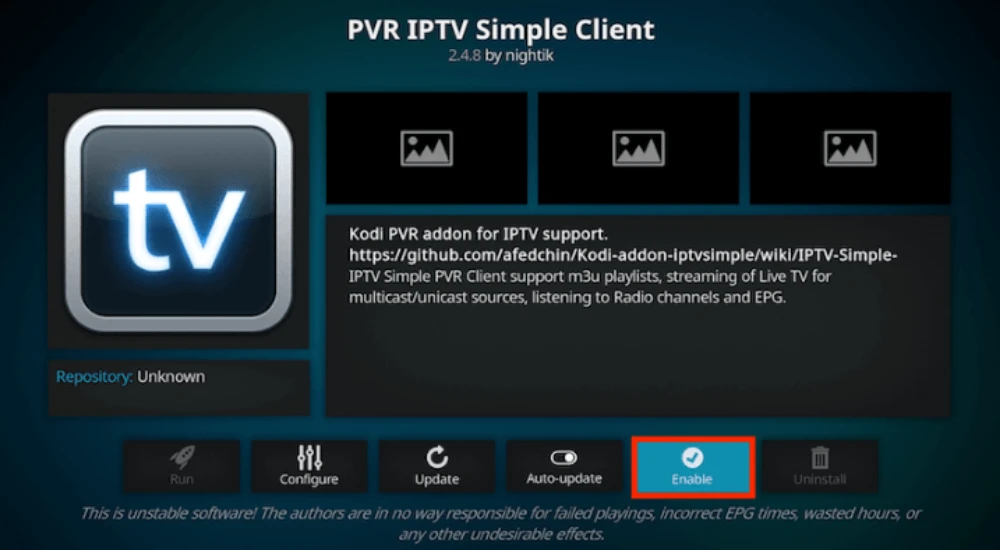
Your configuration is done, but there’s one more critical step. You need to actually enable the add-on for it to start working. While you’re still in the PVR IPTV Simple Client menu, look for the “Enable” button and click it.
If it’s already enabled, you’ll see “Disable” instead—don’t click that, or you’ll turn it off. Kodi might prompt you to restart at this point. Go ahead and let it reboot—this ensures all your new settings take effect properly.
After Kodi restarts, head back to the main menu and look for the TV section. It might take a minute or two for all your channels to populate, especially if you’ve got a playlist with thousands of channels. You’ll see a notification in the corner as Kodi imports and processes everything.
Once the import is complete, click on “Channels” within the TV section. Congratulations—you should now see your entire channel lineup ready to stream.
Alternative Methods and Add-ons
While PVR IPTV Simple Client is the most reliable and widely recommended option, there are a few other add-ons worth mentioning for specific use cases. cCloud TV is a community-driven add-on that aggregates channels from user submissions, offering hundreds of live streams organized by category. The catch? Since it’s community-maintained, channel quality and availability can be hit-or-miss.
Some IPTV providers also offer their own custom add-ons or plugins, like the XtreamTV Plugin. These proprietary solutions are specifically designed to work seamlessly with their service and might offer features like built-in VOD libraries or advanced channel sorting.
However, for most users, especially those new to setting up IPTV on Kodi, sticking with PVR IPTV Simple Client is your safest bet. It’s officially supported, regularly updated, and compatible with virtually any iptv subscription that provides M3U playlists.
Troubleshooting Common Issues
Even with a straightforward setup, you might run into a few bumps along the way. Let’s tackle the most common problems and their fixes.
If your channels aren’t loading at all, double-check that M3U URL. Seriously, this is the culprit nine times out of ten. Make sure there are no extra spaces before or after the URL, and verify with your IPTV provider that the link is still active.
Buffering and freezing during playback usually point to internet speed issues. IPTV streaming, especially in HD or 4K, requires a stable connection of at least 5-10 Mbps. Try running a speed test, and if your connection’s the problem, consider lowering the stream quality or upgrading your internet plan.
Some users report that channels load but the EPG doesn’t show up. If that’s happening to you, verify your EPG URL is correct and that your time zone settings match your actual location. You can adjust these in the PVR IPTV Simple Client configuration under EPG Settings.
If Kodi crashes frequently or displays a black screen when trying to play streams, you might need to clear the cache. Go to Settings > File Manager > Profile Directory, find the Database folder, and delete the “Addons.db” file. Restart Kodi, and it’ll rebuild the database from scratch.
One increasingly common issue involves ISPs blocking certain IPTV streams. Users on networks like Spectrum and T-Mobile Home Internet have reported add-ons working slowly or not at all. If you suspect this might be your issue, connecting through a VPN often resolves the problem entirely.
Choosing a Quality IPTV Provider
Your entire experience hinges on the quality of your iptv service, so it’s worth doing your homework before committing to a subscription. Look for providers that offer reliable uptime, HD or 4K streaming options, and comprehensive channel packages that match your interests.
Legitimate providers typically offer organized dashboards where you can generate your M3U and EPG URLs, manage your subscription, and access customer support. Be wary of services that seem too good to be true—if someone’s promising 50,000 channels for $5 a month, there’s probably a catch.
Some reputable options include established services like YouTube TV, Hulu+ Live TV, and fuboTV for legal streaming. These mainstream services are pricier but offer reliable streams, comprehensive sports coverage, and proper licensing. For international content or niche programming, specialized IPTV providers like IPTV Trends or IPTV Gear have built strong reputations.
Always start with a trial period or short-term subscription if the provider offers it. This lets you test the service’s stability, channel selection, and compatibility with Kodi before committing to a longer contract.
Maintaining Your Kodi IPTV Setup
Once everything’s up and running, a little regular maintenance goes a long way in keeping your setup smooth. Make it a habit to clear Kodi’s cache every few weeks—this prevents performance slowdowns and reduces the likelihood of playback errors.
Keep Kodi itself updated to the latest stable version. The developers regularly push out updates that fix bugs, patch security vulnerabilities, and improve compatibility with various add-ons. You’ll usually get a notification when an update’s available, and the process only takes a few minutes.
If your IPTV provider updates their M3U or EPG URLs, you’ll need to update those in your PVR IPTV Simple Client configuration. Most providers will notify you via email or their dashboard when links change, but if your channels suddenly stop working, this is one of the first things to check.
Finally, if you’re using a device with limited storage like a Firestick or older Android box, periodically free up space by removing unused add-ons and clearing thumbnail caches. A cluttered system can lead to crashes and sluggish performance.