How to Set Up IPTV on Apple (iPhone / iPad / Apple TV) 2026
Best Way to Set Up IPTV on Apple Devices
If you’re looking to transform how you watch TV on your Apple devices, setting up IPTV on Apple products like your iPhone, iPad, or Apple TV opens up a world of streaming possibilities. You’ll get access to thousands of live channels, on-demand content, and international programming—all through your sleek Apple ecosystem. The best part? Getting started is easier than you might think.


. Fast Tutorial for Setup IPTV on Apple .
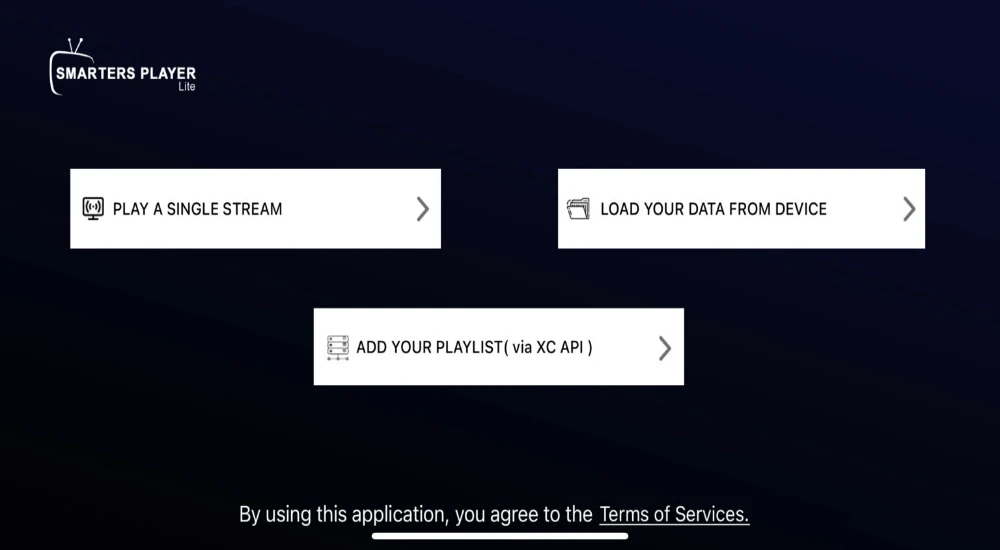
Step 1: Download The IPTV Smarters App From Apple Store Using This
URL: https://apps.apple.com/ma/app/smarters-player-lite/id1628995509?l=en-EN
OR you can search it on APP store : SMARTERS PLAYER LITE
Step 2: After Downloading The App, Open It
Select “Login With Xtream Codes API”
Key In Your Login Details.
Step 3: Enter The Login Details That You Got After Subscribing
With Us And Then Click On ADD USER To Go To The Next Part.

Step 4: Wait For A Few Seconds.
Step 5: Click Live TV Icon As Shown In The Image Below.
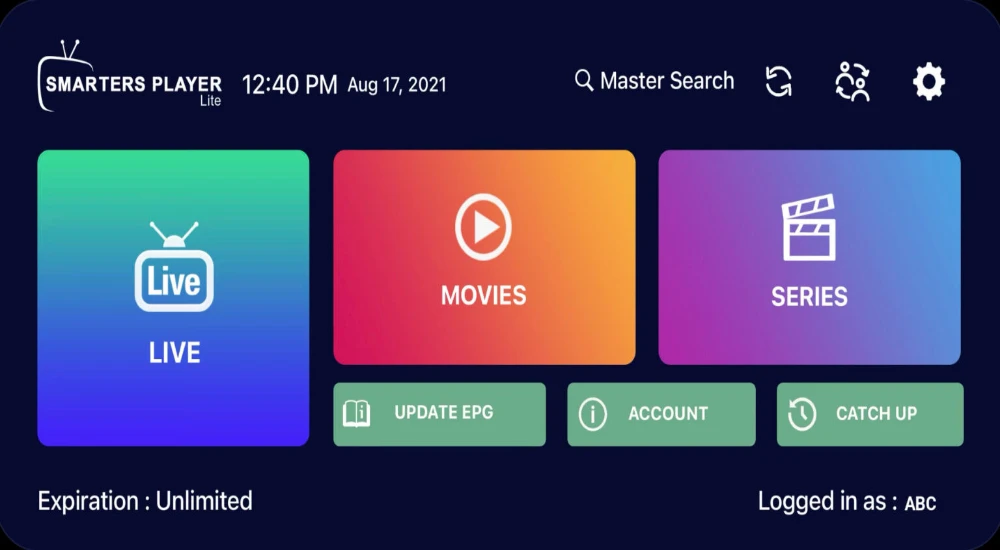
Step 6: Choose The Channel Group You Would Love To Watch
And Go To The Next Section.
Step 7: At This Point, Click On The Name Of The Channel
And Double Click On The Small Screen To Go In To Full Screen As The Last Step.
Step 8: There Is No Need Of Adding Any EPG URL.
Simply Click On Install EPG And You Are Done.
. Complete Guide to Install IPTV on Apple .
Best IPTV Apps for Apple Devices
Before diving into setup, you’ll need to pick an IPTV app. Not all apps are created equal, and choosing the right one makes a noticeable difference in your streaming experience.
IPTV Smarters Pro
IPTV Smarters Pro consistently ranks as one of the most popular choices for Apple users. It’s officially available on the App Store for all Apple devices and supports both M3U playlists and Xtream Codes API. The interface is clean and intuitive, making it perfect if you’re new to IPTV. You’ll also get features like EPG (Electronic Program Guide), parental controls, and the ability to organize your content into favorites.
GSE Smart IPTV
GSE Smart IPTV stands out with its advanced customization options and format compatibility. It handles virtually any streaming format you throw at it—from M3U8 to RTMP streams. The app supports 31 languages and includes built-in 4K player support, Chromecast compatibility, and automatic live stream reconnection. If you like tweaking settings and want maximum control, GSE Smart IPTV might be your best bet.
IPTVX
IPTVX is an Apple-exclusive app that takes full advantage of iOS features. It offers Dolby Vision support, iCloud sync across devices, and comprehensive EPG with catch-up TV functionality. The app is designed specifically for the Apple ecosystem, so it feels right at home on your devices.
Other Notable Options
You’ll also find apps like Xtream IPTV, TiviMate, OttPlayer, and Swiptv in the App Store. OttPlayer is particularly interesting because it uses a web-based management system, letting you organize playlists through a dedicated website. Swiptv focuses on privacy and supports 4K/HDR streaming with AirPlay integration.
How to Set Up IPTV on iPhone and iPad
Setting up IPTV on your iPhone or iPad takes just a few minutes. You don’t need any technical expertise—just your device, an internet connection, and your IPTV subscription details.
Download an IPTV App
Start by opening the App Store on your iPhone or iPad. Search for one of the apps mentioned above—let’s use IPTV Smarters Pro as an example, though the process is similar for other apps. Tap “Get” or “Install” and wait for the download to complete. The app should appear on your home screen within seconds.
Configure Your IPTV Subscription
Once you’ve installed the app, open it up. You’ll typically see an option to add a playlist or log in. Most IPTV providers give you credentials in one of two formats: M3U URL or Xtream Codes API.
If you’re using Xtream Codes (which is pretty common), select “Add via Xtream Codes” or “Login with Xtream Codes API”. You’ll need to enter four pieces of information your IPTV provider gave you: username, password, server URL, and an account name (you can make this one up—it’s just for your reference).
After entering your details, tap “Add User” or “Login.” The app will take a moment to download your channel list and EPG data. Don’t worry if it takes 30 seconds or so—that’s completely normal.
Optimize Your Streaming Settings
Once everything loads, explore the app’s settings menu. You can adjust video quality based on your internet speed—HD for most situations, or lower quality if you’re on cellular data to save your data allowance. Some apps also let you choose external players like VLC for better compatibility with certain stream formats.
How to Set Up IPTV on Apple TV
Getting IPTV running on your Apple TV follows a similar process, but with a few differences due to the tvOS interface.
Access the App Store
Turn on your Apple TV and navigate to the App Store from your home screen. Use the search function (you can use Siri Remote’s voice search to speed things up) and type in the name of your chosen IPTV app.
Install Your Chosen IPTV App
When you find the app—whether it’s IPTV Smarters Pro, GSE Smart IPTV, or another option—select it and click “Get” or “Install”. The installation happens quickly, usually within a few seconds. Once it’s done, the app icon appears on your Apple TV home screen.
Enter Your IPTV Credentials
Open the app and look for the option to add a playlist or login. Just like on iPhone and iPad, you’ll need to select your login method—M3U URL or Xtream Codes API. Enter your username, password, and server URL using the on-screen keyboard (the Siri Remote makes this easier than it used to be).
After adding your credentials, give the app a minute to load all your channels. You should see your channel list populate with logos and EPG information.
Configure EPG and Playlists
Setting up your EPG (Electronic Program Guide) is crucial for a good viewing experience. Most apps automatically pull EPG data from your IPTV provider, but you can manually enter an EPG URL if needed. The EPG shows you what’s currently playing and what’s coming up next, making channel navigation much more convenient.
You can also organize your playlists and create favorites lists for quick access to your most-watched channels.
How to Get IPTV Smarters Pro on Apple TV Specifically
Since IPTV Smarters Pro is one of the most popular apps, here’s a detailed walkthrough specifically for this application.
Check Compatibility Requirements
Before starting, verify that you’re using Apple TV HD or Apple TV 4K with tvOS 13 or later. You’ll also need a stable internet connection—preferably wired Ethernet for the best results. Make sure you have your IPTV subscription details handy: your username, password, and server URL.
Installation Steps
From your Apple TV home screen, launch the App Store. Navigate to the search bar and type “IPTV Smarters Pro”. Select the official app from the results—it should show the IPTV Smarters Pro logo. Click “Get” or “Install” and wait for the download to finish.
Activation Process
Once installed, return to your home screen and open IPTV Smarters Pro. Choose “Login with Xtream Codes” from the options presented. Enter your IPTV provider’s credentials carefully—typos here are the most common cause of login failures. After clicking “Add User,” the app will connect to your IPTV service and load your content.
Troubleshooting Common Issues
If the app doesn’t appear in your App Store search results, you might be in a region where it’s restricted. Try changing your Apple ID region or contact your IPTV provider for alternative app recommendations. If channels won’t load after logging in, double-check your credentials and restart the app.
Optimizing IPTV Performance on Apple Devices
Getting your IPTV set up is one thing—making sure it runs smoothly is another. Here’s how to optimize your streaming experience across all your Apple devices.
Internet Connection Requirements
Your internet speed makes or breaks your IPTV experience. For HD streaming, you need at least 10 Mbps, while 4K content requires around 25 Mbps minimum. If you’re using Apple TV, connect it via Ethernet cable whenever possible—wired connections are more stable than Wi-Fi and reduce buffering.
For iPhone and iPad, stay close to your Wi-Fi router when streaming at home. If you’re using cellular data, consider lowering the stream quality in your app settings to prevent excessive data usage.
Using a VPN for Geo-Restricted Content
Some IPTV channels are region-locked, meaning they won’t work in certain countries. A VPN like ExpressVPN or NordVPN helps you bypass these geo-restrictions by masking your location. You can set up the VPN directly on your Apple device or configure it on your router to protect all devices on your network.
Keep in mind that VPNs can sometimes slow down your connection slightly, so choose a reputable provider with fast servers.
Video Player Settings
Most IPTV apps include built-in video players, but you can sometimes improve compatibility by using external players. VLC and MX Player are popular choices that handle a wider range of stream formats. Check your app’s settings menu for options to select your preferred player.
You can also adjust buffer settings in some apps to reduce stuttering, though this might introduce a slight delay in live content.
Troubleshooting Common IPTV Problems on Apple Devices
Even with everything set up correctly, you might run into occasional hiccups. Here’s how to fix the most common issues.
App Won’t Open or Crashes
If your IPTV app won’t open on your iPhone or iPad, go to Settings > General > VPN & Device Management. Find the app developer and select “Trust”. This usually happens with apps that aren’t downloaded directly from the App Store, though it can occasionally affect App Store apps too.
Buffering and Lagging Issues
Buffering is probably the most frustrating IPTV problem. Start by testing your internet speed—use any online speed test tool to see if you’re meeting the minimum requirements. If your speed is too low, try lowering the stream quality in your app settings.
Restart both your Apple device and your router. Unplug your router, wait about 10 seconds, then plug it back in. Sometimes this simple step fixes persistent buffering issues. Make sure no one else on your network is hogging bandwidth with downloads or other streaming.
If you’re using Apple TV over Wi-Fi, consider switching to a wired Ethernet connection. The difference in streaming stability is often dramatic.
Channels Not Loading
When channels refuse to load, first re-enter your IPTV subscription details. Log out of the app completely, then log back in with your credentials. If that doesn’t work, restart the app or even reinstall it.
Sometimes the issue is on your IPTV provider’s end—certain channels might be temporarily offline or experiencing technical difficulties. Try different channels to see if the problem is widespread or isolated.
EPG Not Working
If your Electronic Program Guide isn’t showing correct information, check that your IPTV provider has supplied the correct EPG URL. You might need to manually enter it in your app’s settings. Some apps update EPG data every few hours, so give it time to refresh.